
Retaining walls add attraction and outdoor space value to your landscape, especially for a sloped yard. It is the most natural way to control eroding, provide usable space for your home, reduce steep slopes or problems related to slopes to add more unique planting bed designs, and create the focal points for your landscape garden. To build a retaining wall might seem simple to install and be reasonably priced with high maintenance, as well as a variety of colors, textures, ideas for almost all homeowners to choose to make use of their outdoor living space.

When planning to build retaining wall ideas, you should find out what to do before going to any physical works. Whether you want to do it yourself or hire professional constructors, in some steps of installation, a retaining wall will require professional engineering to keep its shape. In case that your wall is more than 4 feet tall (including buried blocks), you’ll need to consider finding a constructor and an engineer for grading or drainage.
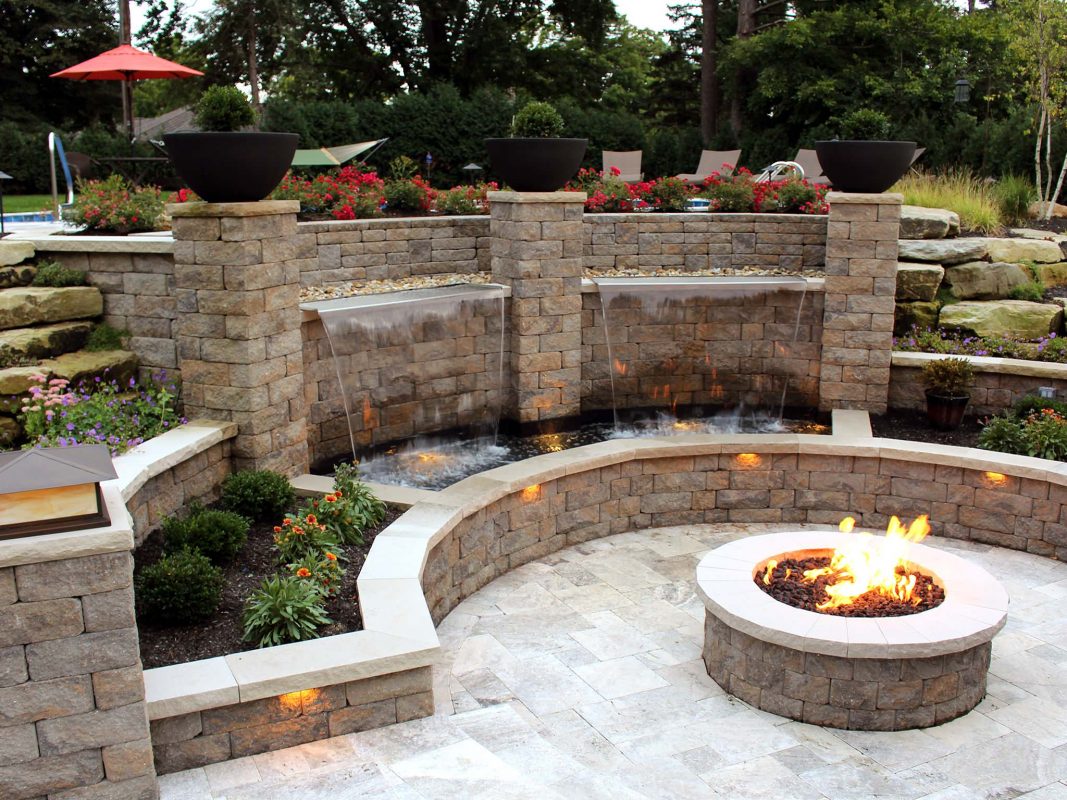
Here are some striking retaining wall ideas which will help you increase usable space and decrease some steep slopes.
Or contact us for more details!
RETAINING WALL STYLE FUNCTION
A thorough retaining wall design will enhance the function of your house and add elegant value to your property. Retaining walls combined with each landscaping detail into a sloped yard provide you an opportunity to create living spaces and welcome guests come to your yard garden.
Stabilize a Steep Slope

The most obvious use of a retaining wall is to reduce steep slopes. You can use stacked bluestone as a simple way to combine both modern and vintage styles for your walls with the beige color behind them. The creativity for your landscape should run along with its function. Don’t let the slopes hinder you from designing your property. Starting to build a retaining wall will give you the best answer for issues of drainage on a slope.
Provide Usable Space for Sloped Area
Most homeowners think that sloped areas are unusable, however, the retaining walls will carve out usable spaces. In many landscaping designs, you totally can use a retaining wall to provide adequate spaces for the entire yard and house with a walkway, a pool, sitting area, firepit area, entertaining area, etc. which will have a large impact on the slope of your backyard.

An experienced contractor can transform the curve land into the driveway or walkway with a planting bed along the hillside to create the patio or provide enough space for the outdoor living area, playing area, garden yard, etc. in the areas which were once a high hillside. Retaining walls make these areas smoother and provide flat spaces for outdoor landscaping with stunning function styles.
Prevent Soil Erosion
The most important function of retaining walls is to battle gravity and keep the soil, as well as water from moving downwards the hill. Because of that, when you consider providing safety for your house and garden, landscaping a retaining wall will help you against eroding. It holds back to earth around the foundation and eliminates the threaten of sliding soil.

Types of Retaining Walls
POURED CONCRETE
Advantages: Strong. Concrete barriers that are well-designed, correctly drained, and backfilled are hard to fail.
Disadvantages: The appearance of bare concrete is unappealing. It can be coated with brickwork or specific forms that integrate beautiful designs in the final wall can be employed. Furthermore, if a wall collapses, mending may be impossible, and deportation is expensive. Unless you’ve done vertical pours before, walls above a few inches high ought to be shaped and poured by a professional.
TIMBER WALLS
Advantages: It’s just relatively difficult to construct oneself about 4 feet high. You can build a higher wall if an engineer planned it, identified the deadmen, and determined the backfill and drainage.
Disadvantages: Not as durable as brickwork. Creating square edges is difficult. Furthermore, the building materials are hefty and difficult to handle individually. Build a 4 feet high by 15 feet in length wall in approximately four days.
INTERLOCKING BLOCKS
Advantages: Interlocking blocks systems do not require mortar and are simple to put together. Walls may taper, bend, wrap, and curve because units are tiny and modular.
Disadvantages: Block systems that employ metal pins to connect each wall block might be difficult to line up precisely.
RETAINING WALL INSTALLATION
Before You Build A Retaining Wall
The first thing you should do is to check the local codes for requirements and check whether there are any underground utility lines before going to any steps of building the retaining walls. In case you’d like to hire a landscaper instead of DIY, make sure this address also has the permit from your local area.

Keep checking the water runoff and drainage system in mind during this project and ensure that the water systems from your house will not be puddled and reduce the endurance of stairs. Call 811 – DigSafe to ask about the local utility before you plan to dig anything up. Then determine whether there are any underground lines and mark the exact locations to avoid it during the process.
REQUIRED TOOLS
To build a retaining wall DIY, make sure you have these right tools. The process will be easier for you and save your time with them:
- Round point shovel: This is useful for moving plants, excavating, and establishing a foundation.
- Square blade shovel: It’s ideal for laying down materials like gravel or sand and grading the region.
- Tamper: Helpful to tamp down the area.
- 4 ft. level: Check to see if the work area and the rows of retaining walls are levels.
- Drilling Hammers: To drive stakes into the ground, a mallet and a 5-pound maul may be useful.
- Adhesive and caulking gun: If you wish to attach finishing caps or add steps, these supplementary materials will come in handy.
- Block chisel
- Tape measure
- Circular saw
- Torpedo level
- Rubber Mallet
In addition, you should prepare safety glasses and a dust mask to protect yourself from physical harm.
REQUIRED MATERIALS
You should plan a list of which materials you need to buy ahead of time you go shopping. This will help you save a significant amount of money and time. This list will include:
- Retaining wall blocks: there is a catalog of each manufacturer that you can opt for your different options of style, color, size, and pattern. Take a firsthand look and compare the prices.
- Paver Base
- Concrete blocks
- Construction adhesive
- Concrete pavers
- Sand and gravel
- Landscape fabric
When you prepare all the tools and materials along with you, the next part will show you how to build a retaining wall DIY step by step.
Retaining wall blocks
STEP 1: DETERMINE THE NUMBER OF WALL BLOCKS REQUIRED
Use the tape measure to determine the wall height. Then divide this number by the length of each wall block you plan to use for your project. In this way, you’ll probably know how many blocks you need to use per row. And to determine how many rows are in your own project, divide the length of your wall by the height of the block.

STEP 2: DIG A TRENCH
Begin digging a trench on the ground level to create a line to follow and make sure the trench is level enough to install a retaining wall on the sloped yard. You’ll need to dig the trench for at least 6 inches of base material and half of the bottom wall block. You definitely can dig deeper but not too shallow. The trenches need digging twice the depth of the wall block so that the blocks are completely buried on the ground.

STEP 3: ADJUST THE SLOPING AREAS
Before getting to build a retaining wall, you must use a torpedo level to create steps for yourself to step up or down so that you can keep the blocks level. Leveling the slope side to side till you finish installing the retaining wall.
Build retaining walls
To build a retaining wall step by step, you have to follow the instruction below:
STEP 1: PACK AND LAYER GRAVEL BASE MATERIAL
If you want a straight wall that won’t shift and move over time, lay down a layer that uses a packed gravel base before placing the first layer. A most-walls-6 inches deep is recommended for a gravel base material, while 4 inches ones are sufficient for a short wall. If you’re constructing retaining walls taller than three feet, you’ll certainly need a license and the services of a structural engineer to design the wall.

Add a gravel base as 2 inches layers, packing it down properly by using a hand tamper or plate compactor after every layer. Return and level it when you’ve built up at least six inches. This step can be completed with either a rope and wire-level or a four-foot level. A further approach is to place a two-foot level upon the 2×4 and then use it to level.
STEP 2: INSTALL THE FIRST ROW OF BLOCKS
Before placing the first row of blocks, use a hammer and mason’s tool to take the lip of the blocks off in order to make them sit flat completely on the ground. For the first course of blocks installation, you will use a straight row with a taut string line. Set the first block in the lowest location of the trench and always check for levelness. Then, continue to lay the next blocks which will be even with the first one.

To make this step faster, make tiny tweaks with the sand. Because it’s so much simpler to deal with than gravel, this will speed up the process of leveling the retaining wall blocks. In addition, hitting the blocks by using a rubber mallet can also help you make some minor modifications.
STEP 3: ADD ROUGH GRAVEL AT THE BACK OF THE FIRST ROW
When the first row of blocks is in place and level and aligned, the following step is adding gravel for drainage behind the blocks. After the gravel is in place, lay some soil upfront in the first row to keep them in the appropriate position. Then, firmly pack the gravel and soil surrounding the blocks to secure them. Packing too tightly can cause your blocks to shift.

It’s critical to add gravel after each row, so you may press it down in order to prevent your retaining wall from tipping backward after a few rows.
STEP 4: INSTALL THE REMAINING LAYERS
Once you finish the first layer, the remains are very easy to complete. Simply add one block by and by, spreading the edges. Assemble the blocks such that they fit snuggly on top of one another. Sometimes pebbles and dirt will enter between them and ruin your perfectly level wall. Sweep the blocks well between rows using a brush.

Add extra 3/4 inches drainage gravel after each row of blocks, dampen it with a hose, and crush it with a tamper or plate compactor. Remember to leave the area enough to install a perforated pipe to carry the water from underground to each end of the retaining wall. Cover this system with crushed rock to protect it from harm and enhance its appearance.
STEP 5: USE CONSTRUCTION ADHESIVE TO SECURE THE TOP ROW OF BLOCKS
After you’ve laid the last layer of blocks, use construction adhesive, such as a caulking gun, to apply glue to the layer behind each block and place them back down. Make sure that you won’t let any dirt or soil enter between the blocks.

STEP 6: BACKFILL WITH SOIL
Fill up the gap at the back of the blocks with soil rather than gravel for the final layer. This will give your new retaining wall a nice clean appearance and permit you to put flowers on top of it.

Or you still can backfill the ground around the wall with crushed gravel if you want to, then tamp it with hand tamper.
SEARCH FOR PROFESSIONAL
Building a retaining wall for our home can be simple work, however, it is not an easy one that you can finish within a few hours with little experience. In case you want to design a retaining wall but you’re not sure about what to begin, the best thing you should do is to find a professional in this field to help you. They have experience and the right tools for each work of this project. Search the information on the Internet and find an address around your location. They will probably prepare the tools and materials for you, as well as from the wall design to the physical work.

To contact Green Arbor for a free quote estimate here is some information that you might need:
- Phone call: (206) 265-2940
- Email: info@greenarborlandscaping.com
- Site: https://greenarborlandscaping.com/